Introduction #
What’s the difference between me and my guitar teacher? Years of experience, a mastery of techniques, and countless hours of practice. If I’m willing to spend hours improving my guitar skills, shouldn’t I do the same for the tools I use every day at work, especially if it can boost my productivity and reduce the risk of health issues?
As mentioned in the previous article, this series focuses on practical techniques you can incorporate into your daily routine to reduce the risk of Repetitive Strain Injury (RSI), while also improving comfort and productivity. Let’s kick things off with Touch Typing.
The Problem #
Picture a chicken pecking for food, head bobbing up and down. Got that image? Great. Now, imagine someone typing on their keyboard, glancing down every few seconds to make sure their fingers are on the right keys. Congratulations, you’ve just visualized what I like to call Chicken Syndrome!

This repetitive head movement, though instinctive, can lead to more than just a quirky typing style. Every time you crane your neck to check the keyboard, you’re inviting strain to your neck muscles, potentially paving the way for RSI. In other words, your “chicken pecks” might turn into a real pain in the neck, literally.
The solution to this? Touch typing.
Touch Typing #
Definition #
Touch typing is a technique that relies on muscle memory to type without needing to look at the keyboard. Each finger is assigned specific keys, which improves speed, accuracy, and minimizes strain, no more “chicken peck”! For many, it also addresses the common issue of not using all ten fingers. By spreading the work evenly across all fingers, it reduces the strain on overused ones and limits the distance your hands and fingers need to travel, helping to lower the risk of RSI.
In addition to physical benefits, touch typing also enhances accuracy and reduces mental load. Since you no longer need to think about key placement, you can type more efficiently and stay focused, which leads to fewer mistakes.
Honestly, taking into account all these benefits, I don’t understand why learning to use a keyboard properly isn’t taught in schools. Almost everyone will need to use one at some point, yet we just assume people will figure it out on their own. The problem is that years of self-taught typing lead to bad habits that can be tough to break. And don’t even get me started on the younger generation, they’re likely encountering keyboards much later in life, thanks to growing up with smartphones, tablets, and other touch-based devices.
Getting Started #
Patience and Practice #
Learning touch typing is rewarding but requires patience. Here’s what to expect and how to overcome early frustrations
Patience and practice are crucial when learning touch typing. You’ll probably feel frustrated at times, especially when you’re typing slower than usual at first or trying to break old habits that have been around for years. The key is to push through that initial discomfort, whether it’s mental or physical, and stick with it.
A tip from experience: treat this like learning a musical instrument. Short, consistent practice sessions will always outperform marathon training. Start with personal, low-pressure typing tasks before jumping into work-related ones.
Core Principles #
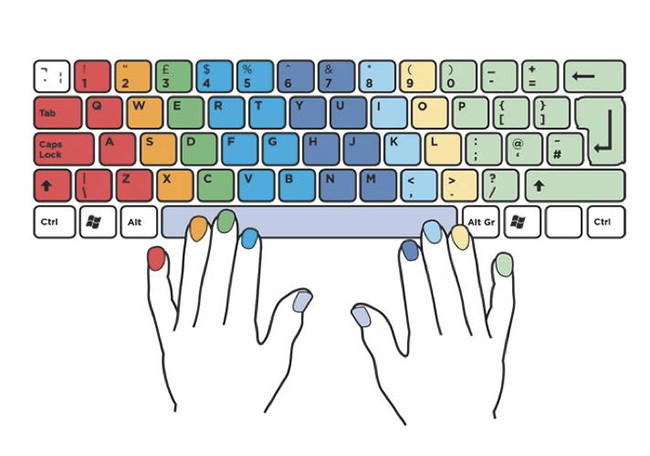
First, position your hands on the Home Row (the middle row of the keyboard). Place your index fingers on the keys with tactile markers (‘F’ and ‘J’ on a QWERTY layout). This setup minimizes hand movement by keeping your fingers close to the home row, allowing them to move only as much as needed.
Use all ten fingers to type. This helps distribute the effort evenly across all fingers rather than overloading just the index fingers. At first, your fingers might feel sore because they’re not used to the motion, but don’t worry, this discomfort won’t last long. Importantly, every key has an assigned finger, so you’ll no longer need to stretch your left index finger over to the right side of the keyboard.
Finally, keep your eyes on the screen. Touch typing is designed to help you focus on your screen, improving your workflow and reducing neck strain. If you catch yourself looking at the keyboard, try hiding it, this is a trick my grandma used back when she learned to type on a typewriter! You could also print or display a keyboard layout on your screen as a guide. The ultimate goal is to familiarize yourself with the keys so you don’t need to look at the keyboard anymore, and completely rely on muscle memory.
Step-by-step Guide #
Mastering touch typing can be broken down into a few key phases:
- Set Up Your Posture and Hand Positioning
Before diving into the keys, ensure your posture and hand placement are correct. Proper ergonomics can reduce strain and make the learning process more comfortable:
- Sit up straight with your feet flat on the floor.
- Adjust your chair and desk height so your forearms are parallel to the keyboard
- Keep your wrists slightly raised above the keyboard, avoiding resting them on the desk.
- Your fingers should naturally curve over the home row keys without excessive tension.
- Learn the Keys Start by familiarizing yourself with the keys under your fingers. It’s unrealistic to learn the entire keyboard at once, so focus on small sections. Begin with the keys directly under your index and middle fingers (e.g., D, F, J, K on a QWERTY keyboard). Practice these keys until they feel natural, and you no longer need to think about which finger to use. Gradually expand your focus by adding two more keys at a time, until you’ve mastered the entire home row. After that, move on to the rows above and below, using the same incremental approach.
- Practice with Longer Texts Once the keyboard layout is committed to memory, shift your focus to typing longer passages. Accuracy is more important than speed at this stage. Aim to develop muscle memory by typing without looking at the keyboard.
- Switch Layouts (Optional) If you’re learning a new keyboard layout (e.g., Dvorak or Colemak), consider transitioning fully to it once you feel confident. This phase is optional but useful if you’re moving away from QWERTY.
- Refine and Build Speed When touch typing becomes second nature, it’s time to focus on improving your speed. Continue practicing with exercises and timed tests to boost both speed and precision.
Tools #
To learn touch typing, many tools exist. Try some of them, pick your favorite, and stick with it. It will help you compare your typing speed before and after learning touch typing.
Here are some popular online tools for learning touch typing:
- TypingClub: A highly interactive typing tutor with structured lessons, progress tracking, and gamification to keep you motivated. Ideal for beginners and advanced users alike.
- Keybr: Uses AI to generate personalized exercises based on your weaknesses, helping you improve typing speed and accuracy efficiently. Features a sleek, minimalist interface.
- Monkeytype: A modern and highly customizable typing test platform that lets you practice with different texts, layouts, and themes. Includes real-time analytics to track progress.
- 10FastFingers: A competitive typing test website where you can measure your speed, challenge friends, and even participate in multiplayer races. Great for boosting speed in a fun way.
- Ratatype: Offers a structured typing course with detailed reports on accuracy and speed. Includes group leaderboards for a competitive learning experience.
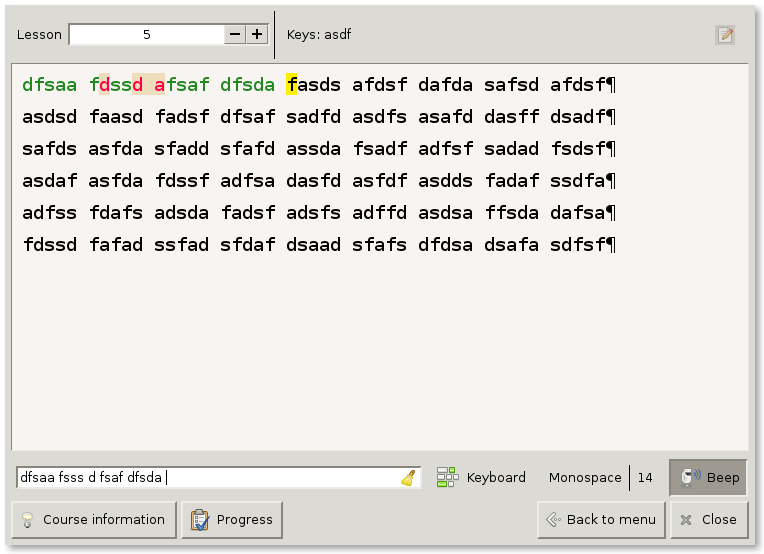
Back in the day, I used Klavaro, a free software compatible with Windows, Linux and macOS.
Personal experience #
Before 2015, when I first started exploring ergonomics, my typing habits were far from ideal. I used at most eight fingers, with my left hand often wandering over to the right side of the keyboard, and vice versa. That said, I never really saw it as a problem, my typing speed was fine, and I wasn’t experiencing any pain. While better ergonomics can certainly help with speed, that wasn’t what led me to touch typing.
Touch typing was actually my first step into the world of keyboard ergonomics. I learned it while simultaneously switching to a new keyboard layout (which I’ll talk about in the next article). Learning a new keyboard layout was a big advantage. Since I was already relearning key placements, I wasn’t fighting against years of muscle memory, and I couldn’t rely on looking at the keyboard because the letters weren’t where I expected them to be anyway.
My practice routine was simple, just 15 minutes a day during lunch. People often say they don’t have 15 minutes to spare, but when you really want to improve at something, you find the time. For me, that meant cutting back on mindless scrolling and YouTube binges. After a month, I felt confident enough to fully commit to my new layout.
Unfortunately, I didn’t run any benchmarks at the time to compare my initial typing speed to my current speed. I don’t believe my speed increased significantly, as I was already a fairly fast typist and never aimed for 100+ WPM, either before or after learning touch typing. My best estimate is that I was around 60-70 WPM before, and now I consistently reach 75-80 WPM.
Fast-forward to 2025, and I’m learning touch typing all over again! I recently decided to switch from Bépo to Ergo-L, a French keyboard layout, so here I am, back at square one, but this time with experience on my side.
Conclusion #
Touch typing is more than just a way to type faster, it’s a fundamental skill that enhances accuracy, reduces strain, and allows for a more comfortable and efficient workflow. By building muscle memory and eliminating the need to look at the keyboard, you can free up mental energy to focus on what truly matters: your work, your thoughts, or even just getting through emails more smoothly.
If you’re new to touch typing, the transition may feel slow and frustrating at first, but the long-term benefits far outweigh the initial discomfort. A few minutes of daily practice can lead to a lifetime of improved typing efficiency and reduced strain.
But touch typing is only part of the equation. The layout of your keyboard plays a significant role in comfort and efficiency as well. In the next article, we’ll explore different keyboard layouts, how they compare to QWERTY, their advantages, and why some people (myself included) make the switch. Stay tuned!
Related Reading #
- Farhan Faiyaz describes his journey in Touch Typing Changed My Life from typing at 25 WPM using the “hunt and peck” method to achieving over 100 WPM after mastering touch typing.
- Piyush Sharma shares his experience in Journey from 30 to 80 wpm of improving their typing speed through consistent touch typing practice.
- Hakan Serce decided to learn touch typing and discusses in Do Programmers Actually Need Touch Typing? its impact on his coding efficiency.
- Jeff Atwood highlights in We Are Typists First, Programmers Second the importance of touch typing for programmers.